Pita bread, a staple in Middle Eastern and Mediterranean cuisines, is celebrated for its soft texture and unique pocket feature, which is created by steam puffed up in the dough during the baking process. This round, flat bread is made from simple ingredients: wheat flour, water, yeast, and salt. The versatility of pita bread lies in its ability to pair well with a wide range of fillings and dips, making it a perfect choice for sandwiches, wraps, or as a companion to dishes like hummus and tzatziki. Its preparation involves mixing, kneading, and rolling the dough into small rounds that puff up in a hot oven, forming the characteristic pocket. Pita bread’s appeal extends beyond its taste and convenience; it also serves as a cultural symbol in many of the cuisines it features in, representing a shared history and tradition of bread-making.

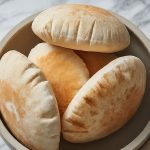
Pita Bread
- Total Time: 30 minutes
- Yield: 8 pitas 1x
Ingredients
- 2–1/2 cups all-purpose flour
- 1/4 cup whole wheat flour
- 2 tsp yeast
- 1 tsp salt
- 1/2 tsp sugar
- 2 Tbsp olive oil
- 1 cup warm water
Instructions
- Preheat oven to its maximum temperature (500-550° F) with a baking steel or pizza stone in the middle rack, approximately 8-10 inches from the top.
- In the bowl of a stand mixer, add warm water, yeast, and sugar. Stir and let it sit until foamy (approximately 5 min).
- Add 1/4 cup of all-purpose flour and 1/4 cup of whole wheat flour.
- Use the dough hook attachment on the stand mixer and set to medium-low speed until homogenous.
- Let the dough sit for 15 minutes.
- Add the salt, olive oil, and remaining 2-1/4 cups of all-purpose flour, then continue to mix on medium low until all of the ingredients are mixed together.
- Divide the dough into eight equal parts, then roll each piece into a ball
- Cover the dough balls in a damp towel and allow to rest for 10-15 minutes.
- Use a tortilla press to flatten each ball. Do not press too hard, try to flatten the dough without letting out all the gas.
- Bake in the oven on top of the hot steel for two minutes.
- Flip each pita, then bake for another two minutes.
Notes
- Use parchment paper on both sides to prevent the dough from sticking to the tortilla press
- After pressing the dough, keep one of the pieces of parchment paper on the dough. This will prevent it from shrinking. Place it in the oven with the parchment paper, then remove the parchment paper when you flip the pita to bake the other side.
- You can bake the pitas in batches if they don’t all fit on the baking steel at the same time.
- Prep Time: 20
- Cook Time: 10
The origins of pita bread trace back to the Middle East and have been a part of human diet for thousands of years. Its history is intertwined with the development of agriculture in the Fertile Crescent, where wheat was first domesticated and flatbreads became a dietary staple. The simplicity of its ingredients and the minimal equipment required for its preparation made pita an ideal bread for nomadic lifestyles and early agricultural societies. Over time, the technique of making pita spread across the Middle East and Mediterranean, adapting to local tastes and ingredients, which contributed to the variety of flatbreads similar to pita found in these regions today.
The making of pita bread is both an art and a science, requiring precise timing and temperature control. The dough is mixed until smooth and elastic, then divided into portions and rolled into flat rounds. The key to achieving the perfect puff lies in the temperature of the oven, which must be extremely hot (around 475°F to 500°F) to create the steam that inflates the dough. This process results in the pita’s distinctive pocket, ideal for filling. After baking, pitas are often wrapped in a cloth to keep them soft and pliable, ready to be sliced or filled with ingredients of choice.
Pita bread’s culinary versatility is one of its most celebrated attributes. It can be served in various ways: cut into wedges and toasted for dipping, filled with meats, vegetables, and sauces for sandwiches, or simply used as a utensil for scooping up dips and salads. Its neutral flavor complements both savory and sweet fillings, making it a globally beloved food. In many cultures, pita is more than just a form of sustenance; it’s a part of the meal that brings people together, symbolizing hospitality and community.
Beyond its role in traditional and modern cuisines, pita bread also offers nutritional benefits. It is a good source of carbohydrates and fiber, especially when made from whole wheat flour. Some versions of pita are enriched with additional nutrients, such as vitamins and minerals, to enhance their health benefits. As dietary habits evolve, pita bread remains a relevant and adaptable food, capable of meeting a variety of dietary needs and preferences, from gluten-free alternatives to whole grain options. The following recipe and photo will guide you through making your own pita bread, inviting you to explore the rich flavors and traditions that this simple yet extraordinary bread embodies.